Friday, March 15, 2019
Kubernetes Setup Using Ansible and Vagrant
Author: Naresh L J (Infosys)
Objective
This blog post describes the steps required to setup a multi node Kubernetes cluster for development purposes. This setup provides a production-like cluster that can be setup on your local machine.
Why do we require multi node cluster setup?
Multi node Kubernetes clusters offer a production-like environment which has various advantages. Even though Minikube provides an excellent platform for getting started, it doesn’t provide the opportunity to work with multi node clusters which can help solve problems or bugs that are related to application design and architecture. For instance, Ops can reproduce an issue in a multi node cluster environment, Testers can deploy multiple versions of an application for executing test cases and verifying changes. These benefits enable teams to resolve issues faster which make the more agile.
Why use Vagrant and Ansible?
Vagrant is a tool that will allow us to create a virtual environment easily and it eliminates pitfalls that cause the works-on-my-machine phenomenon. It can be used with multiple providers such as Oracle VirtualBox, VMware, Docker, and so on. It allows us to create a disposable environment by making use of configuration files.
Ansible is an infrastructure automation engine that automates software configuration management. It is agentless and allows us to use SSH keys for connecting to remote machines. Ansible playbooks are written in yaml and offer inventory management in simple text files.
Prerequisites
- Vagrant should be installed on your machine. Installation binaries can be found here.
- Oracle VirtualBox can be used as a Vagrant provider or make use of similar providers as described in Vagrant’s official documentation.
- Ansible should be installed in your machine. Refer to the Ansible installation guide for platform specific installation.
Setup overview
We will be setting up a Kubernetes cluster that will consist of one master and two worker nodes. All the nodes will run Ubuntu Xenial 64-bit OS and Ansible playbooks will be used for provisioning.
Step 1: Creating a Vagrantfile
Use the text editor of your choice and create a file with named Vagrantfile, inserting the code below. The value of N denotes the number of nodes present in the cluster, it can be modified accordingly. In the below example, we are setting the value of N as 2.
IMAGE_NAME = "bento/ubuntu-16.04"
N = 2

Vagrant.configure("2") do |config|
    config.ssh.insert_key = false

    config.vm.provider "virtualbox" do |v|
        v.memory = 1024
        v.cpus = 2
    end

    config.vm.define "k8s-master" do |master|
        master.vm.box = IMAGE_NAME
        master.vm.network "private_network", ip: "192.168.50.10"
        master.vm.hostname = "k8s-master"
        master.vm.provision "ansible" do |ansible|
            ansible.playbook = "kubernetes-setup/master-playbook.yml"
        end
    end

    (1..N).each do |i|
        config.vm.define "node-#{i}" do |node|
            node.vm.box = IMAGE_NAME
            node.vm.network "private_network", ip: "192.168.50.#{i + 10}"
            node.vm.hostname = "node-#{i}"
            node.vm.provision "ansible" do |ansible|
                ansible.playbook = "kubernetes-setup/node-playbook.yml"
            end
        end
    end
Step 2: Create an Ansible playbook for Kubernetes master.
Create a directory named kubernetes-setup in the same directory as the Vagrantfile. Create two files named master-playbook.yml and node-playbook.yml in the directory kubernetes-setup.
In the file master-playbook.yml, add the code below.
Step 2.1: Install Docker and its dependent components.
We will be installing the following packages, and then adding a user named “vagrant” to the “docker” group. - docker-ce - docker-ce-cli - containerd.io
---
- hosts: all
  become: true
  tasks:
  - name: Install packages that allow apt to be used over HTTPS
    apt:
      name: "{{ packages }}"
      state: present
      update_cache: yes
    vars:
      packages:
      - apt-transport-https
      - ca-certificates
      - curl
      - gnupg-agent
      - software-properties-common

  - name: Add an apt signing key for Docker
    apt_key:
      url: https://download.docker.com/linux/ubuntu/gpg
      state: present

  - name: Add apt repository for stable version
    apt_repository:
      repo: deb [arch=amd64] https://download.docker.com/linux/ubuntu xenial stable
      state: present

  - name: Install docker and its dependecies
    apt:
      name: "{{ packages }}"
      state: present
      update_cache: yes
    vars:
      packages:
      - docker-ce
      - docker-ce-cli
      - containerd.io
    notify:
      - docker status

  - name: Add vagrant user to docker group
    user:
      name: vagrant
      group: docker
Step 2.2: Kubelet will not start if the system has swap enabled, so we are disabling swap using the below code.
  - name: Remove swapfile from /etc/fstab
    mount:
      name: "{{ item }}"
      fstype: swap
      state: absent
    with_items:
      - swap
      - none

  - name: Disable swap
    command: swapoff -a
    when: ansible_swaptotal_mb > 0
Step 2.3: Installing kubelet, kubeadm and kubectl using the below code.
  - name: Add an apt signing key for Kubernetes
    apt_key:
      url: https://packages.cloud.google.com/apt/doc/apt-key.gpg
      state: present

  - name: Adding apt repository for Kubernetes
    apt_repository:
      repo: deb https://apt.kubernetes.io/ kubernetes-xenial main
      state: present
      filename: kubernetes.list

  - name: Install Kubernetes binaries
    apt:
      name: "{{ packages }}"
      state: present
      update_cache: yes
    vars:
      packages:
        - kubelet
        - kubeadm
        - kubectl
Step 2.3: Initialize the Kubernetes cluster with kubeadm using the below code (applicable only on master node).
  - name: Initialize the Kubernetes cluster using kubeadm
    command: kubeadm init --apiserver-advertise-address="192.168.50.10" --apiserver-cert-extra-sans="192.168.50.10"  --node-name k8s-master --pod-network-cidr=192.168.0.0/16
Step 2.4: Setup the kube config file for the vagrant user to access the Kubernetes cluster using the below code.
  - name: Setup kubeconfig for vagrant user
    command: "{{ item }}"
    with_items:
     - mkdir -p /home/vagrant/.kube
     - cp -i /etc/kubernetes/admin.conf /home/vagrant/.kube/config
     - chown vagrant:vagrant /home/vagrant/.kube/config
Step 2.5: Setup the container networking provider and the network policy engine using the below code.
  - name: Install calico pod network
    become: false
    command: kubectl create -f https://docs.projectcalico.org/v3.4/getting-started/kubernetes/installation/hosted/calico.yaml
Step 2.6: Generate kube join command for joining the node to the Kubernetes cluster and store the command in the file named join-command.
  - name: Generate join command
    command: kubeadm token create --print-join-command
    register: join_command

  - name: Copy join command to local file
    local_action: copy content="{{ join_command.stdout_lines[0] }}" dest="./join-command"
Step 2.7: Setup a handler for checking Docker daemon using the below code.
  handlers:
    - name: docker status
      service: name=docker state=started
Step 3: Create the Ansible playbook for Kubernetes node.
Create a file named node-playbook.yml in the directory kubernetes-setup.
Add the code below into node-playbook.yml
Step 3.1: Start adding the code from Steps 2.1 till 2.3.
Step 3.2: Join the nodes to the Kubernetes cluster using below code.
  - name: Copy the join command to server location
    copy: src=join-command dest=/tmp/join-command.sh mode=0777

  - name: Join the node to cluster
    command: sh /tmp/join-command.sh
Step 3.3: Add the code from step 2.7 to finish this playbook.
Step 4: Upon completing the Vagrantfile and playbooks follow the below steps.
$ cd /path/to/Vagrantfile
$ vagrant up
Upon completion of all the above steps, the Kubernetes cluster should be up and running. We can login to the master or worker nodes using Vagrant as follows:
$ ## Accessing master
$ vagrant ssh k8s-master
vagrant@k8s-master:~$ kubectl get nodes
NAME         STATUS   ROLES    AGE     VERSION
k8s-master   Ready    master   18m     v1.13.3
node-1       Ready    <none>   12m     v1.13.3
node-2       Ready    <none>   6m22s   v1.13.3

$ ## Accessing nodes
$ vagrant ssh node-1
$ vagrant ssh node-2
2018.03.15
Principles of Container-based Application Design
现如今,几乎所有的的应用程序都可以在容器中运行。但创建云原生应用,通过诸如 Kubernetes 的云原生平台更有效地自动化运行、管理容器化的应用却需要额外的工作。 云原生应用需要考虑故障;即使是在底层架构发生故障时也需要可靠地运行。 为了提供这样的功能,像 Kubernetes 这样的云原生平台需要向运行的应用程序强加一些契约和约束。 这些契约确保应用可以在符合某些约束的条件下运行,从而使得平台可以自动化应用管理。
我已经为容器化应用如何之为云原生应用概括出了七项原则。
| —– |
| 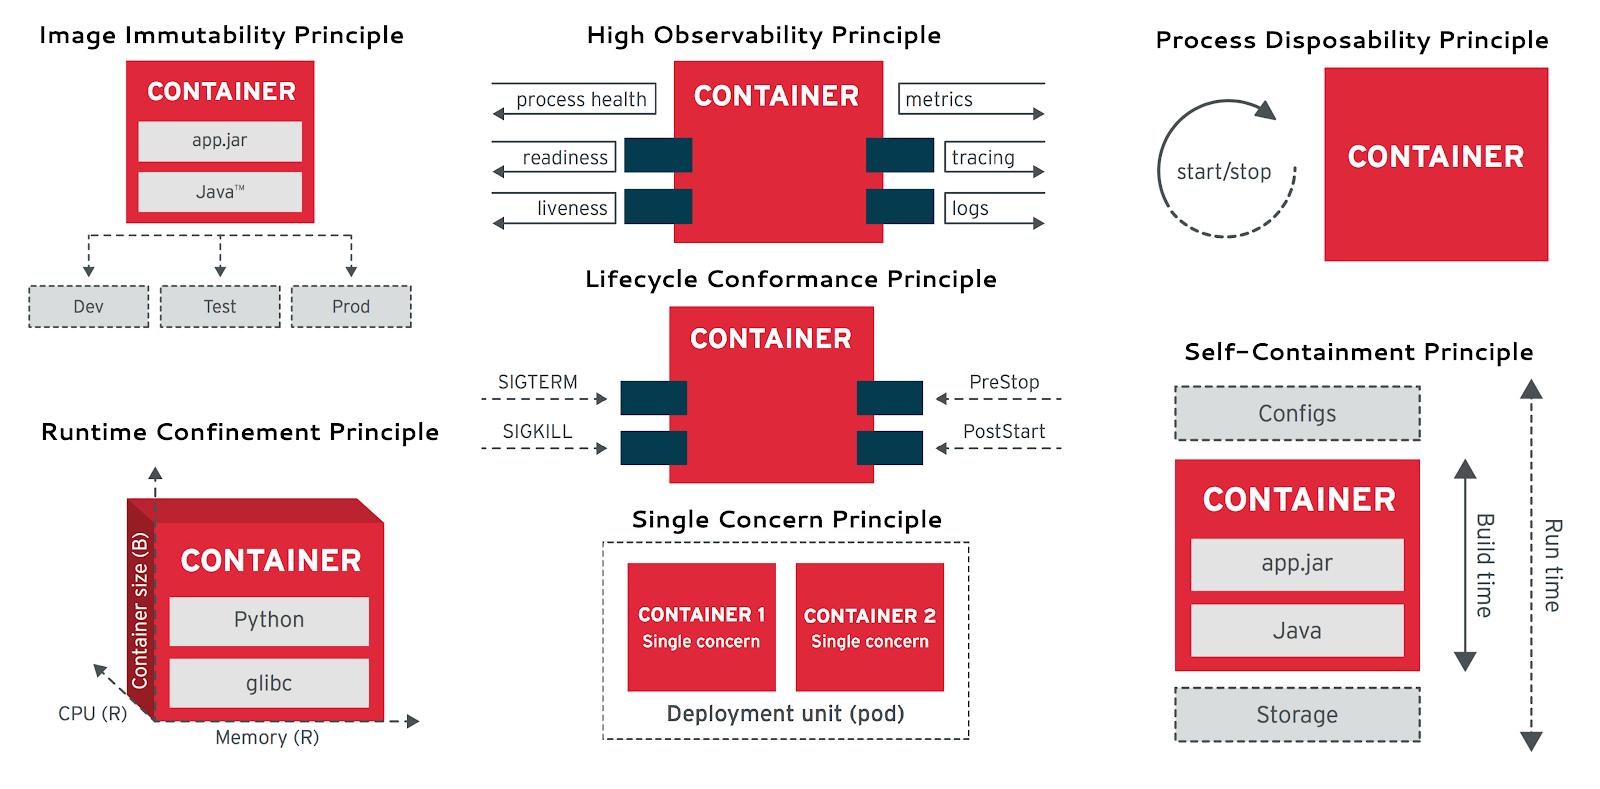
这里所述的七项原则涉及到构建时和运行时,两类关注点。
构建时
- 单一关注点: 每个容器只解决一个关注点,并且完成的很好。
- 自包含: 一个容器只依赖Linux内核。额外的库要求可以在构建容器时加入。
- 镜像不变性: 容器化的应用意味着不变性,一旦构建完成,不需要根据环境的不同而重新构建。
运行时
- 高可观测性: 每个容器必须实现所有必要的 API 来帮助平台以最好的方式来观测、管理应用。
- 生命周期一致性: 一个容器必须要能从平台中获取事件信息,并作出相应的反应。
- 进程易处理性: 容器化应用的寿命一定要尽可能的短暂,这样,可以随时被另一个容器所替换。
- 运行时限制: 每个容器都必须要声明自己的资源需求,并将资源使用限制在所需要的范围之内。
编译时原则保证了容器拥有合适的粒度,一致性以及结构。运行时原则明确了容器化必须要实现那些功能才能成为云原生函数。遵循这些原则可以帮助你的应用适应 Kubernetes 上的自动化。
白皮书可以免费下载:
想要了解更多关于如何面向 Kubernetes 设计云原生应用,可以看看我的 Kubernetes 模式 一书。
— Bilgin Ibryam, 首席架构师, Red Hat
Twitter: Blog: http://www.ofbizian.com Linkedin:
Bilgin Ibryam (@bibryam) 是 Red Hat 的一名首席架构师, ASF 的开源贡献者,博主,作者以及演讲者。 他是 Camel 设计模式、 Kubernetes 模式的作者。在他的日常生活中,他非常享受指导、培训以及帮助各个团队更加成功地使用分布式系统、微服务、容器,以及云原生应用。